Our cats love to hang out on the window sills, especially when the windows are open. They bird-watch and chatter at squirrels or just sniff the air, looking all relaxed and happy. I often thought it would be nice if they could go outside in a controlled area just to get a better view and find more sun.
So… since I had some free time the past four months (*cough*), I decided that I would create just such an area for the cats… a cat veranda, if you will. It was an adventure.
 I first made the base out of some scrap wood we had in the garage. I was going to make the enclosure frame out of wood too, but upon further consideration, 3/4″ PVC pipe seemed like it would be easier… and easier means faster means I’ll actually finish the project. That was easily decided.
Planning a moderately elaborate “box” made out of PVC is not as easy as one might initially believe. Most hardware stores don’t carry three-point “corner” pieces in the plumbing department. They exist, but they’re not common, so I had to plan odd corners and convoluted joints using right angle elbows and Ts… both of which add about 3/4″ to the length of the pipe… and I was using sometimes six pieces in a single run.
 My plans were sketchy at best, but I muddled through the measurements with a cup of coffee, a pencil, and a now overused eraser. I’ve decided that PVC math is hard and I don’t want to do it anymore. It turned out that I had everything right except for one end, which had corner posts about two inches short… an easy fix.
So I figured out what I needed (more or less) and headed to Lowe’s (like Home Depot, but blue), plans in my pocket, to make the purchase. Easy in. Easy out. As an added bonus, I was able to fit the five 10-foot sticks of PVC in my Mercury Montego with all the doors and windows closed.
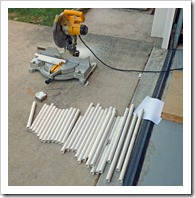
 So now I had all my stuff and it was time to start chopping up the PVC into the needed lengths. I broke out the chop saw and went to work (measure twice, cut once). Everything was going great until I neared the very end and (insert many colorful expletives here) I realized that I need three more feet of PVC. Three feet! I ran around the house looking for some extra lying around, but of course all I could find was 1/2″ and 1″… no 3/4″. I was going to make a mental note about something related to it, but the thought got drowned out in the continued profanity.
This time I went to Home Depot (it’s 1/4 mile closer) and grabbed another 10-foot stick of 3/4″ PVC.
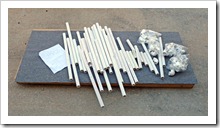
 Okay… all set. Good to go. Time to start putting this puppy together. My plans were weighted down so they wouldn’t blow away because if I lost them, this project would have been over. I wasn’t going to do that &$%!*# PVC math again. I had about 53′ of cut PVC, 30 Ts, and 10 elbows. I had cleaner and glue, too, but I wasn’t sure if I needed it (or wanted it… it’s a bit unforgiving).
 Things went pretty well during the assembly. I made a few changes on the fly (and they actually worked out). It all stayed together fairly well without the glue. A wooden mallet helped with that.
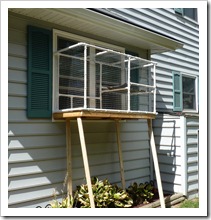
So the frame was complete, but it certainly wouldn’t keep a cat contained… not even a lazy one. So it was time to add the wire. I got 1″x1″ fencing wire, cut it to fit each section, and zip tied it into place. A few cuts and scrapes later and it actually looked like an enclosure.
Point of note… I used to make rabbit hutches and sell them when I was in high school, so I’ve worked with cage wire a lot (not chicken wire, but the good stuff). If anyone offers you the opportunity to work with 1″x1″ wire or 1″x2″ wire or pretty much anything similar… don’t.
 So I had my cage. I had my base. Now I had to assemble the whole kit and kaboodle into a working unit that could be inhabited by cats. Sadly, I hadn’t really thought it through this far… at least not definitively. It had to rest against a dual kitchen window… and somehow not fall over, collapse, rip down the siding, destroy the screens, or demolish the window frame. Plus it had to somehow link to the inside of the house… you know, so the cats could actually go into it?
Whose crazy idea was this?!
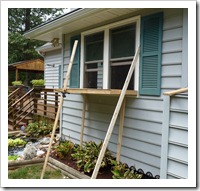
 Okay… so I figured it wasn’t going to hang off the window all by itself, so I made slots to hold legs, put four legs under it, added a lip to sit on the edge of the window frame, and used the interior window panel (that I made but didn’t photograph) to hold it all into place… sort of like a window air conditioning unit. I stand by that design, but I’ll withhold final judgment until after the next windstorm.
All that was left was to attach the enclosure and toss in some cats. Easier said than done (on both counts).
 I attached the enclosure using more trusty zip ties and some eye hooks. I didn’t photograph that in detail because, frankly, it’s embarrassing. However, it did work and I’m assuming it’s all still in place, though I can’t see it while sitting in front of my computer.
Next came the cat test! Lori shoved Houdini through the door, which was pretty easy because he didn’t fight it. He took to it right away, checking it all out and hopping up on the platform.
Peanut wasn’t too happy about getting shoved through the door, but she checked it out and decided that, at least for now (without the sun beating down on her), the couch was a more desirable choice.
Sophie loved it and hung out there for a good half hour until she realized that we’d eaten dinner and she hadn’t gotten any.
Chexie didn’t get to try it because Peanut hates her. I’ll have to make a special one for her.
Here they are checking it out.
So… all done. The cats had better appreciate it or we’re getting rid of them and getting new cats that do.
I’m going to go bandage up my hands now.


